Scroll down for our Lotion tutorial but if you would like to make other products, sign up to our Free, online formulation course from Chemists Corner, Swiftcraftymonkey and Making Skincare
As a first step to making your own products, we highly recommend enrolling on our free course (over 17,500 students).
It’s online so you can start anytime and work at your own pace. Free PDF certificate of completion included!
Click to Enroll
Learn from a renowned cosmetic scientist how to make a natural lotion, cream & body butter
In this tutorial we will walk you through how to make a natural lotion, cream, body butter and moisturiser from scratch. But if you’d like a calculator which creates a recipe for you CLICK HERE or CLICK HERE if you already have your own recipe. Both calculators convert % to weight and also tell you ingredient costs (instructional videos are at the end).
Lotions, creams, body butters and moisturisers are all emulsions and are made the same way with mostly the same ingredients. Lotions and moisturisers tend to be more fluid than creams or body butters so may contain less oils, less emulsifier and less thickener. Moisturisers and creams are usually used on the face and special ingredients called actives are more likely to be included. Also less “heavy” oils are used.
The vast majority of body butters found in the stores are emulsions, however, there is a trend amongst homecrafters to create products which contain no water (anhydrous) and label them “body butters”. This leads us to the next paragraph.
Why create an emulsion?
A common complaint of non-water containing products, such as body butters and balms are they are greasy, heavy and can be grainy. These complaints can be solved by creating an emulsion. Emulsions allow oils and butters to be applied to the skin in an aesthetically pleasing fashion and offers the formulator a great degree of formulation flexibility and easy modification of characteristics such as viscosity, feel and appearance. Emulsions allow otherwise incompatible ingredients, such as oils, glycerine and actives to be brought together in the same product.
EQUIPMENT FOR HOMECRAFTERS
1. SCALE – Two types – one for large amounts and one for small amounts:-
Large: click for UK, click for USA
Small: click for UK, click for USA
2. NON-MERCURY GLASS LAB THERMOMETER (buy 2 at least as over time they might break): – click for the UK, and click for the US.
3. MIXER – use an ordinary stick blender for batch sizes above 300g. For batches below 300g search google for: Bosch 12010905 or 12009583 so you can buy the small attachment. You can then buy Bosch MSM2610B (an ordinary stick blender), which the small attachment fits onto. For more information on mixers check out our video: https://youtu.be/p1BAe43IqZU?si=d33WbCNFV1xLa57v
4. TWO BAIN MARIES/DOUBLE BOILERs/WATER BATH.s These can be easily created. To make a double boiler, buy two metal trivets/rings (to place the beakers on top of so the beakers do not touch the bottom of the saucepan). Trivets come in all sorts of forms – a ring or cooling rack, for example this one or you may use an empty tuna or sardine can or even a cookie cutter. If you are in the UK use ebay to search for the words: gas safety stars. (If you are using an induction hob please use a trivet which is made of aluminium otherwise the trivet can heat up to over 100°C/212°F). To use the double boiler to heat the water phase and oil phase as per the instructions in this tutorial, fill roughly one quarter/third of the saucepan with hot water. Sit the beaker on an empty tuna can or trivet which is placed the bottom of the saucepan so the container is not in direct contact with the saucepan.
5. TWO AUTOCLAVABLE GLASS OR POLYPROPYLENE CHEMICAL RESISTANT LAB BEAKERS. Click for the UK, and for the USA either lotioncrafter tri-pour beakers or this.
6. CONTAINER to hold your cool down phase ingredients
7. SANITIZER – 70% isopropyl alcohol (Amazon, Ebay, Walgreens and Walmart sells). 70% is more effective than 100% as the water in the solution denatures the microorganisms’s proteins.
8. pH strips and pH papers are, on the whole, very inaccurate. A pH meter such as this one is therefore recommended. If, however, pH strips must be used, the ones which we found most accurate (0.5 units, three colours) by a long way is this. For formulators in Europe these can be purchased here. For instructions on how to change pH click here.
SUPPLIERS & VITAL INFORMATION
Suppliers:-
– UK/Europe: www.gracefruit.com, www.thesoapkitchen.co.uk, www.aliacura.de, https://www.glamourcosmetics.it/gb/
– In the US: lotioncrafter, makingcosmetics, the herbarie
Click here for a comprehensive worldwide list of ingredient suppliers.
WATER
– What type of water? Use distilled water. Do not use tap water or bottled water or mineral water as this contains chemicals which can shorten shelf life.
– How to calculate how much water to use? The amount to include in your formula is whatever you need to make your formula add up to a total of 100%. If all your ingredients excluding water add up to 40% then your water % will be 60% as 60% is needed for the formula to add up to 100%. If all your ingredients excluding water add up to 20% then your water % will be 80%.
– What about losing water from evaporation due to heating the emulsion? When you heat water, some will evaporate as steam. We will be heating and holding our water phase for 20 minutes. This will kill some of the non-endospore forming bacteria. We usually find at least 10% water will evaporate. Please do make up for the water which evaporated otherwise your percentages of ingredients will be inaccurate, for example, the preservative which should have been added at 0.5% ends up being 0.8%. You can do this by adding an extra 10% water at the start of lotionmaking and then at the end (evaporation occurs during cool down also), weigh the lotion to see how much water above the 10% has evaporated and add that. Every time a lotion is made a different amount of water will evaporate. If you have a question on this topic, after joining our facebook group you can ask your question at the end of this post.
PRESERVATIVES
– Essential, not optional. “Preservative-free” is a myth! Products claiming to be preservative free either are not properly preserved, fail to list the preservatives on the label or as the preservatives used have a dual purpose the seller is relying on the other purpose as their function. Vitamin E, benzoin, rosemary extract, grapefruit extract are anti-oxidants not preservatives – they will help with oxidation of oils only and do nothing to help prevent gram positive and negative bacteria and fungi which grow in anything containing water. If your lotion is unpreserved it will last up 5 days in the fridge. We cannot rely on our vision to check whether our lotion is preserved properly because bacteria and spores are microscopic and cannot be seen by the human eye. Home test kits are very unreliable. The ideal preservative is broad spectrum meaning it guards against bacteria – both gram negative and gram positive and fungi, For preservative choices and more information click here.
– IMPORTANT: Including tea, goat’s milk, honey, hydrosols, floral waters, aloe vera, extracts, protein, powders, starches and such like in your formula will really challenge the preservative. It is, however, possible to include, for example, 50% aloe vera or hydrosol in a formula and still pass preservative tests if the formula is carefully formulated with that in mind and the supplier’s copy of the micro testing for the batch of aloe/hydrosols in the formula (could be in the Certificate of Analysis) shows that ingredient is less than 100 cfu/gram or ml and no staphylococcus aureus, candida albicans or gram negative bacteria!
-You only need to preserve products which contain water or water phase ingredients – this includes goat’s milk, aloe vera, hydrosols, floral water as they contain mainly water.
WHAT KIND OF MEASUREMENTS SHOULD BE USED?
– Weight: Weight is determined by the heaviness, or mass, of the particular item, and is measured with the use of a scale, for example grams, ounces (weight), pounds. Volume: Volume is the amount of space that an item you are measuring takes up. It’s a common measurement in food recipes and recipes where ratios are more important than precision, for example fluid ounces, teaspoons, drops, cups, ml. An important point to note is that some oils are heavier than others, for example, one cup of sunflower oil will weigh a different amount to one cup of olive oil. Feathers and candy floss take up a lot of space (volume) but weigh very little for their size.
– Weight measurements are more accurate and this means a scale will be used to weigh ALL ingredients. However, all recipes will start off in percentages so we can easily determine and adjust the ratios of ingredients and therefore it’s properties – feel, texture and performance. Also, using percentages means we can make any batch size we like from very small to a huge batch.
– All the % in the table below are of % of total batch size. So if you are adding 3% glycerin that is 3% of total batch size rather than 3% of the water phase. If you are adding emulsifier at 6% that will be 6% of the total batch size.
and to participate click here.
FREE LOTION AND CREAM FORMULA CALCULATOR FOR DIFFERENT SKIN TYPES
We have two free calculators which both convert percentages to weight and work out the costs of the ingredients in your formula. One also creates a recipe for your specific skin and body type (click here). The other (click here) you can use if you already have a recipe.
SHELF LIFE
Your product’s shelf life will be ultimately determined by a stability test. However to get some idea of the shelf life of your ingredients, look up each of your ingredients’ shelf lives and whichever ingredient expires first will impact the shelf life of your lotion.
If you are selling your product, a three month stability test will need to be performed. As any changes in a lotion will take place faster at higher temperatures, samples are put at different environmental conditions which include a range of temperatures from room temperature, 4°C /39°F (usual fridge temperature) to 40-45°C (104°F-113°F). Samples are checked every 2, 4, 8, 12 and 24 weeks to see if they change over time. If there is very little change after 3 months then the product may last for two years if it also passes other tests, such as preservative. You can buy a reptile egg incubator to carry out the 40-45°C (104°F-113°F) check.
EMULSIFIERS
Our article on emulsions and stability recommends natural emulsifiers (at least two effective emulsifiers must be used), provides details on how to create a stable emulsion and what concentrations to use. Do not forget to include two stabilisers so your lotion stays emulsified! It is important to note, cetyl/cetearyl alcohol and beeswax are not emulsifiers and some emulsifying waxes do not emulsify! Questions on emulsifiers? After joining our group, ask your question at the end of this post.
WHERE TO LEARN MORE
Many people prefer to learn through watching video. We were invited by the admin of another Facebook group to run a one hour Facebook live video where Jane from Making Skincare and Christine from Formulate Natural Cosmetics answered questions and walked viewers through creating their own unique formula. To access the video, click here to join the group (don’t forget to answer the joining questions). Once you have been accepted, click here to watch the video. It is best to watch the video on a laptop or tablet and under the “like” button, next to “most relevant”, click the drop down arrow and select “realtime comments” so you can see in real time the questions we are answering. By the end of the video you will have formulated your first formula, unique to you.
In addition to our article on emulsions and stability, the “How for Formulate like a Pro” article is essential reading for any formulator wishing to take their formulation knowledge to the next level.
For those formulators who wish to test their formulation knowledge, every couple of weeks we run an Instagram challenge and post a terrible formula for you to spot the errors. It’s a great way to learn and fun too. For more details and to participate click here.
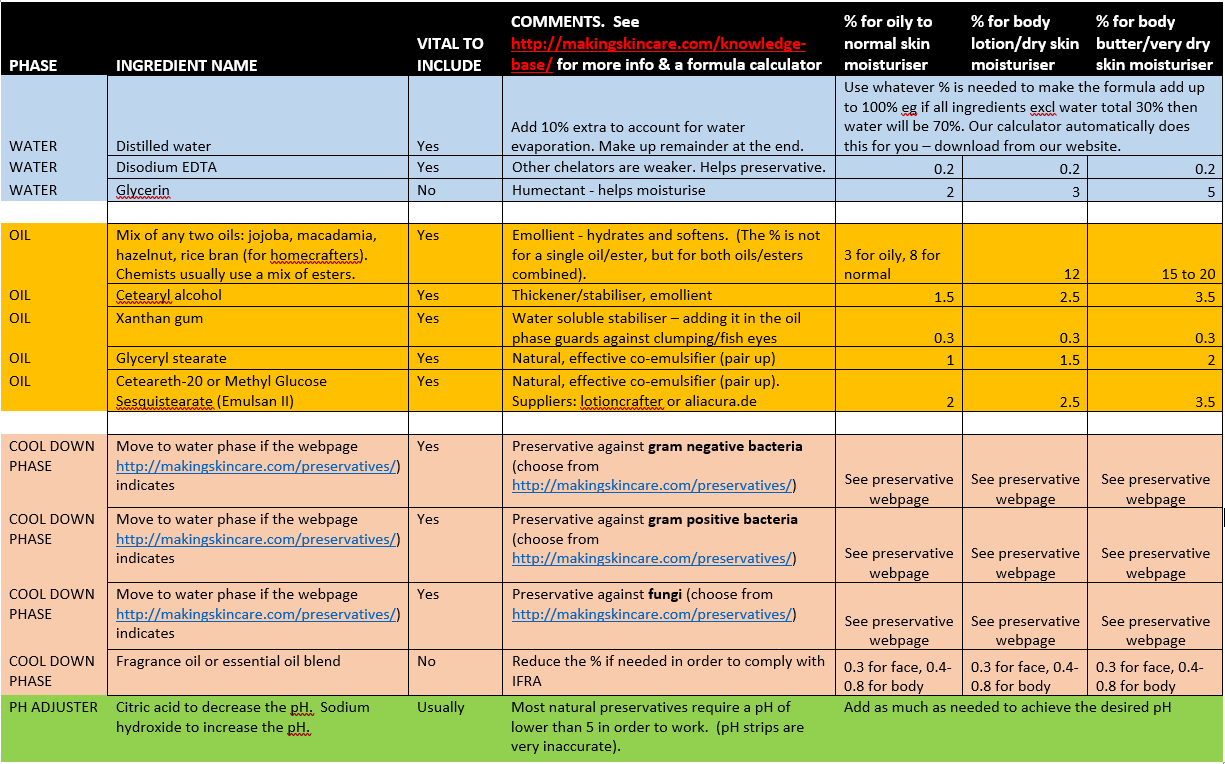
THE FORMULAS (for homecrafters)
The table below provides basic starter formulas for homecrafters and chemists, for lotion, moisturiser and body butter for various skin types. We also have a recipe calculator which has a base formula and converts the % to grams or ounces for you as well as the price. In the table below,the preservatives are listed in the cool down phase but they should be moved to a different phase if the preservative article indicates this. The column headed “vital to include” indicates if the ingredient must be included. If, the column indicates that the ingredient is vital and you choose to substitute it or exclude it your emulsion will likely be compromised. If an ingredient is added to the formula which is not listed in the table below this could also compromise the emulsion. This is especially true if the ingredient is an electrolyte (aloe vera, green tea, magnesium “oil”) or causes preservation difficulties (aloe vera, milk, protein, clay, honey).
Troubleshooting Need help? After joining our group, ask your question at the end of this post if your emulsion looks unstable. If you wish to tweak your formula to make it thicker, thinner, less sticky, less oily, click here.
pH. For instructions on how to change pH click here and for information on how to measure pH and what to buy click here and go to paragraph 11.
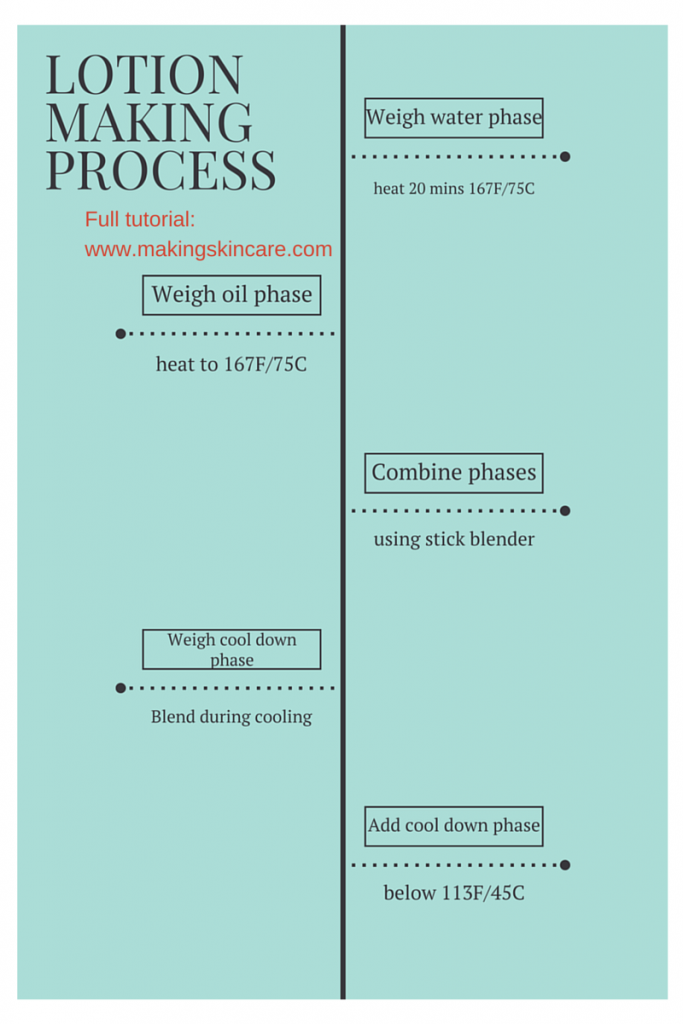
PROCESS FOR HOMECRAFTERS AND CHEMISTS
1. Sanitise containers, countertops, equipment. Boil some distilled water in case you need it later to make up the water which evaporated (if more than 10% water evaporated).
2. Weigh your WATER PHASE into your container.
• Heat the water phase using either a hotplate or bain marie/double boiler/water bath (see equipment section above), to around 75°C/165°F and hold it at around that temperature for 20 minutes.
Note: 75°C for 20 minutes cannot be counted on to sterilize a product. It will likely reduce microbial levels by killing some of the non-endospore-forming bacteria, but it will probably not kill all of them. To access a discussion between expert chemists and microbiologists on why the heat and hold is needed, after joining our group click here. (It should be noted that chemists are not taught this 20 minute period as when an emulsion is scaled up it will automatically receive more than 20 minutes heat and hold as an average emulsion will take approximately three times longer to produce in the factory).
3. While your water phase is heating, weigh your OIL PHASE into your other container.
Heat the oil phase up to roughly the same temperature as the water phase using either a hotplate or bain marie/double boiler/water bath (see equipment section above). You DO NOT need to hold the oil phase for 20 mins, however, we will need to heat the oil phase up to the same temperature as the water phase when you combine the phases for a proper emulsion (see below).
4. After the water phase has had 20 minutes at around 75°C/165°F and the oil phase is also at that temperature follow the steps below.
• Slowly pour one of the phases into the other and mix for 2-5 minutes with a homogenizer or for homecrafters, a stick blender/mini mixer. Do not use a milk/coffee frother or whisk or spoon/fork as emulsions need high shear.
• Mix as the lotion cools. (Chemists will use an overhead stirrer for cool down phase stirring and homecrafters use a stick blender switched on intermittently.)
5. Weigh your cool down phase ingredients into a separate container. When the lotion cools down to 45°C/110°F, add your cool down phase ingredients and mix very well.
• You will notice your lotion will start to thicken up quite quickly while the lotion cools and it will continue to thicken up over the next hour or so.
6. Allow the lotion to continue to cool down to room temperature.
• Weigh the lotion to see if more than 10% water has evaporated. If it has, add some of the pre-boiled water to make up the difference and mix well. (Evaporation also occurs during the cool down period and a different amount of water will evaporate each time the lotion is made).
Test the pH and change as needed. For instructions on how to change pH click here.
7. Pour your lotion into jars/bottles only once it has cooled down to room temperature otherwise there will be condensation inside the container. The condensation will not contain preservative.
Finished!